Wednesday, February 22, 2017

Simple Lace Headband

During my trip to New York last year, my best friend and I went to The Strand Book Store. It was heaven for book lovers like us. Right outside the store they had shelves and tables of pre-loved books that were on sale. Besides the cheap price (from $1 a book!), I've always been drawn to these second hand books because of their history and the stories behind them, and the beautiful chaos they present. Chaotic, because they are often piled unsorted, sometimes with no categorisation, only grouped by their prices. I get a high from browsing through these books, and the excitement of finally finding a treasure among them is unexplainable. (So much book passion!)

Only this time, it wasn't me who found the treasure. My best friend casually handed me this book of crochet patterns after she chanced upon it, saying something like, "Here, buy this, you might find it useful for your recent crochet hobby." And buy I did! It was only for a dollar, and had a lot of stitch patterns inside, and it was the best purchase I had on that trip (apart from all the good pizza and cheesecake that we had).

The book has a lot of patterns that can be used in almost all kinds of projects - scarves, blankets, beanies, etc. I got so excited! But since I acquired this book when I was still a newbie, I was not yet confident in making my own designs (and yes, I had difficulties reading the patterns). After almost a year of practice, I'm finally posting my first design based on one of this book's patterns. Yay!

It's a simple pattern, which I initially intended to use in a beanie, but when I saw how it looked I thought it would be a good design for a headband too. I'm not sure what this kind of pattern is called, but I'll just call it a lace because of its holes.


Materials
Hook: 3.75mm crochet hook
Yarns:
Dapper Dreamer Bamboo Cotton Blue Steel (dark blue / navy)


Headband

Ch 75. To increase length, add multiples of 12.
Note: Each ch 3 at the end of each row is the turning chain, and will serve as a dc unless otherwise stated. In cases where the turning chain is ch 6, the first 3 chains will serve as a dc and the next 3 chains will be a chain space.

Row 1: dc in the fifth ch from the hook, dc in the next 3 sts. *ch 3, skip 2 chains, dc in the next 10 sts. Repeat from *, and end the row with dc in each of the last 5 sts. Ch 3, turn. (60 sts, 6 3-ch spaces)

Row 2: dc in the next 2 sts (3 dc now including the turning ch), *ch 3, sc in the 3-ch space, ch 3, skip 2 sts, dc in the next 6 sts. Repeat from *, and end the row with dc in each of the last 2 sts, dc in the turning ch. Ch 6, turn. (42 sts, 12 3-ch spaces)

Row 3: *sc in the 3-ch space, ch 3, sc in the next ch space, ch 3. Skip 2 sts, dc in the next 2 sts, ch 3. Repeat from *, and end the row with 1 dc in the turning ch. Ch 3, turn. (24 sts, 18 3-ch spaces)

Row 4: *2 dc in the 3-ch space, ch 3, sc in the next ch space (the middle one), ch 3, 2 dc in the next ch space, dc in the next 2 sts. Repeat from *, and end the row with 1 dc in the turning ch. Ch 3, turn (42 sts, 12 3-ch spaces)

Row 5: dc in the next 2 sts, 2 dc in the 3-ch space, *ch 3, 2 dc in the next ch space. Dc in the next 6 sts, 2 dc in the next ch space. Repeat from *, and end the row with 1 dc in the turning ch.

From here, you can either fasten off, or continue to the headband ends.


Headband Ends

If you fastened off your yarn, join yarn in any corner of the headband.

We will be working on the side of each row now, and we will treat each row to be 2 sts (e.g., 1 horizontal dc is equivalent 2 sts). Note that we will work on both ends of the headband, one end will be the button end (where the button will be attached) and the other end will be the button hole end.


Row 1: Ch 2, dc in the same row (this will serve as a dc2tog for this row and the succeeding rows). 2 dc in the next 3 rows, dc2tog in the last row. (8 sts)

Row 2: Ch 2, dc in the next st. Dc in the next 4 sts, dc2tog in the last 2 sts. (6 sts)

Row 3:
For the button end: Ch 2, dc in the next st. Dc in the next 2 sts, dc2tog in the last 2sts (4 sts). Fasten off.
For the button hole end: Ch2, dc in the next st. Dc in the next st, ch 2 (or 3, depending on the size of your button), dc in the next st, dc2tog in the last. Fasten off.


You can also opt to join both ends of the headband and get rid of the button by doing a whip stitch or by slip stitching them together. You can also choose to have a tie-back headband by chaining at the end of each headband end, and doing sc's along the chain for a thicker tail. If you want to make a thicker headband, you can use thicker yarn. You can also add 1 row of stitches (dc, hdc, or sc) if you want your holes to be not on the edge.

And there you have it! Fast and simple. I'll be posting more designs inspired by my crochet book in the coming days. Enjoy crocheting AF! \m/


This pattern is free and not for sale. Please credit and link back to this site when sharing, using for business, etc. Thanks! :)

Wednesday, February 15, 2017

Spinning Summer Slouchy Beanie

This is yet another beanie that I made as a gift for one of my friends for Christmas last year. I actually made this just early this year because I was really swamped making all of those handmade gifts weeks before Christmas. Fortunately, my friend is a nurse and has a crazy schedule, and we don't meet in person often, so I was pretty sure we weren't going to meet during the busy holidays. The same goes for our friend who does research at the university; she doesn't have a crazy schedule but we almost always meet up only when all three of us can go. I will be posting her beanie too in the following weeks, so stay tuned for that. :)

Going back to my nurse friend's beanie, like most of my crocheted gifts, I wanted to give her something personal and something that suits her. She's the type of person who, despite her busy schedule, loves to go out on trips especially to beaches and everywhere else that involves bodies of water. So of course, I wanted to give her something somewhat related to that. But the theme of my gifts for Christmas was beanies, so I had to give her a beanie too. That was a bit problematic because usually beanies are for keeping you warm, and if you are in the beach, you won't really need a beanie! So I thought of giving her a beanie that's not really warm and that she can still use even if the weather's a bit hot.

Soooo, I searched for beanies that were lacy or that had holes in them. At first I found some patterns with little holes, one of them I also made as a gift for one of my cousins (will post this one soon, too!). But the one I found in Moogly was the one that made me think, yes, this is the perfect beanie for her. I was so excited to make it because it looked really unique and cool (temperature-wise). And I also can't wait to give it to my friend!


Pattern here.

The pattern is so simple and so easy that I made it in a breeze (and this beanie is breezy, too!). It looks complicated because of the spiral effect and the vents, but it really just involved chains and double crochets. You can definitely wear this on hot days; very stylish and fashionable. Even after finishing it, I'm still excited 😄 I really love how this beanie turned out, and I am so happy I made the right choice.  Hopefully my friend will love it too (I know she will because I made it, haha!).

So there you have it! Hope you enjoy this pattern as much as I did. Enjoy crocheting AF! \m/


This pattern is free and not for sale. Please credit and link back to this site when sharing, using for business, etc. Thanks! :)

Wednesday, February 8, 2017

Linked Hearts Bracelet

Hearts, hearts, hearts! It's Hearts Day in less than a week! Let's get on to our yarns and hooks and make our loved ones (including ourselves, too!) some handmade gifts filled with love. ❤

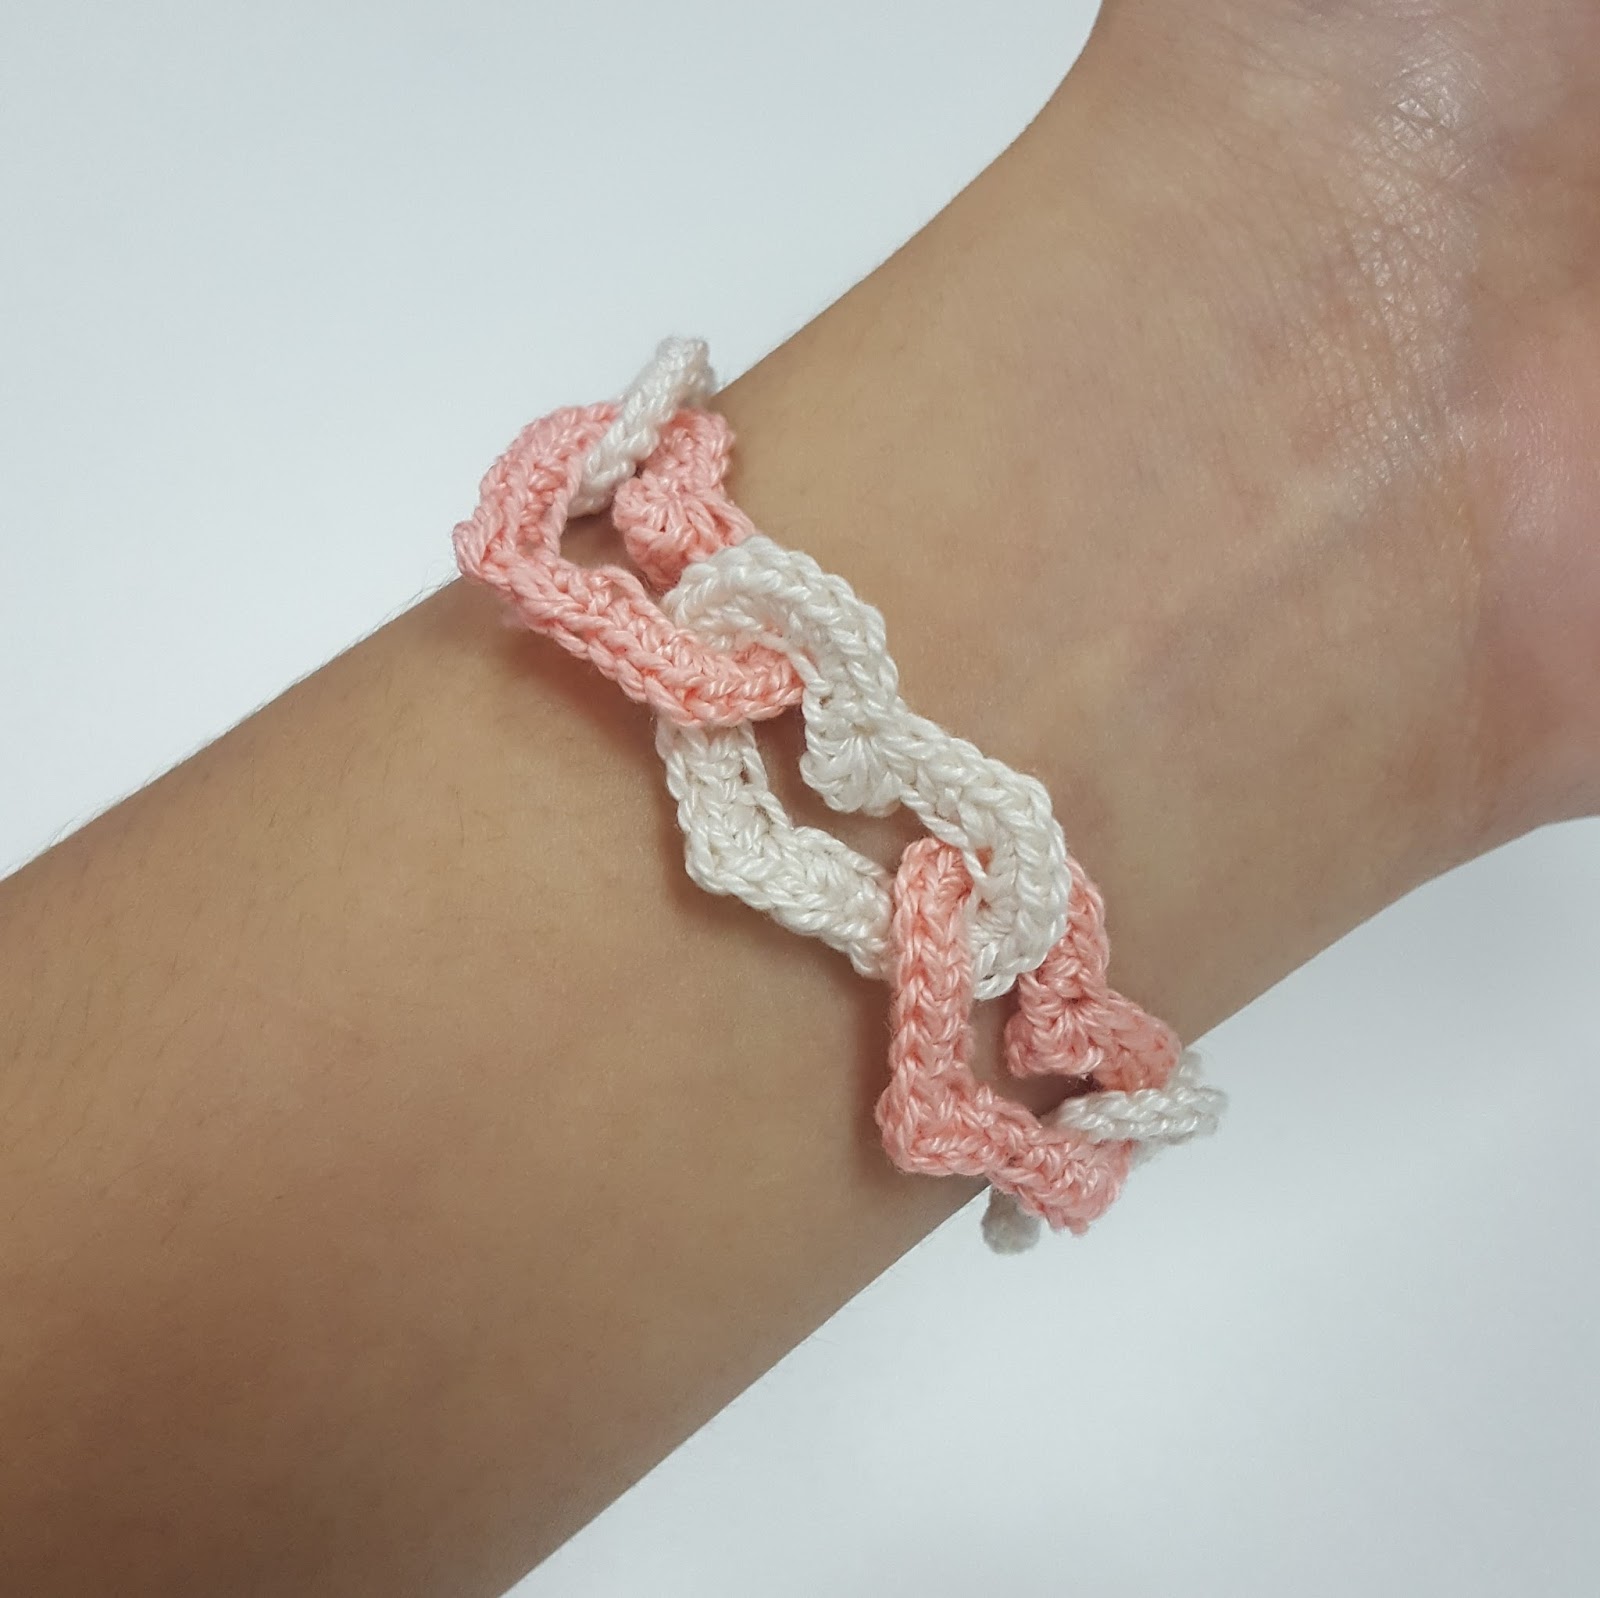
Previously I made a heart cactus amigurumi which is so cute and perfect for Valentines Day. For this post, I made bracelets out of linked hearts. I was inspired to do this design when I saw a beanie with linked hearts, but the pattern was not free so I had to figure this one out myself. I also chose to use a thin yarn so I will have smaller and cute hearts. It took me around three to four trials before I got the size and shape of the heart I want. But it's totally worth it! So what are you waiting for? Check out the pattern below.


Materials
Hook: 2mm crochet hook
Yarns
Any lace yarn of your choice. For me I used the following:
Monaco Salmon Pink (B621)
Monaco Ecru (B61)
Red lace yarn (I forgot what brand this is)

Stitches Used
ch (chain)
sl st (slip stitch)
sc (single crochet)
dc (double crochet)
sc5tog - It's like a sc2tog, but instead of inserting your hook and pulling up a loop in just 2 stitches, you do it in 5 stitches.


Linked Hearts Pattern


First Heart


Ch 20, sl st to the first ch to form a ring. Be careful not to twist your chain!

Sc in the same ch where you slip stitched. Sc in the next 2 sts. (3 sts)

3 sc in the next 3 ch. (12 sts)

Sc in the next ch. (13 sts)

Sc5tog in the next 5 sts. (14 sts)

Sc in the next ch. (15 sts)

3 sc in the next 3 ch. (24 sts)

Sc in the next 3 ch. (27 sts)

Sc, dc, sc in the last ch. (30 sts)

Sl st to the first sc. Fasten off.

Second (and succeeding) Heart


As in the first heart, ch 20. Insert your chain to the first heart, then sl st to form a ring.

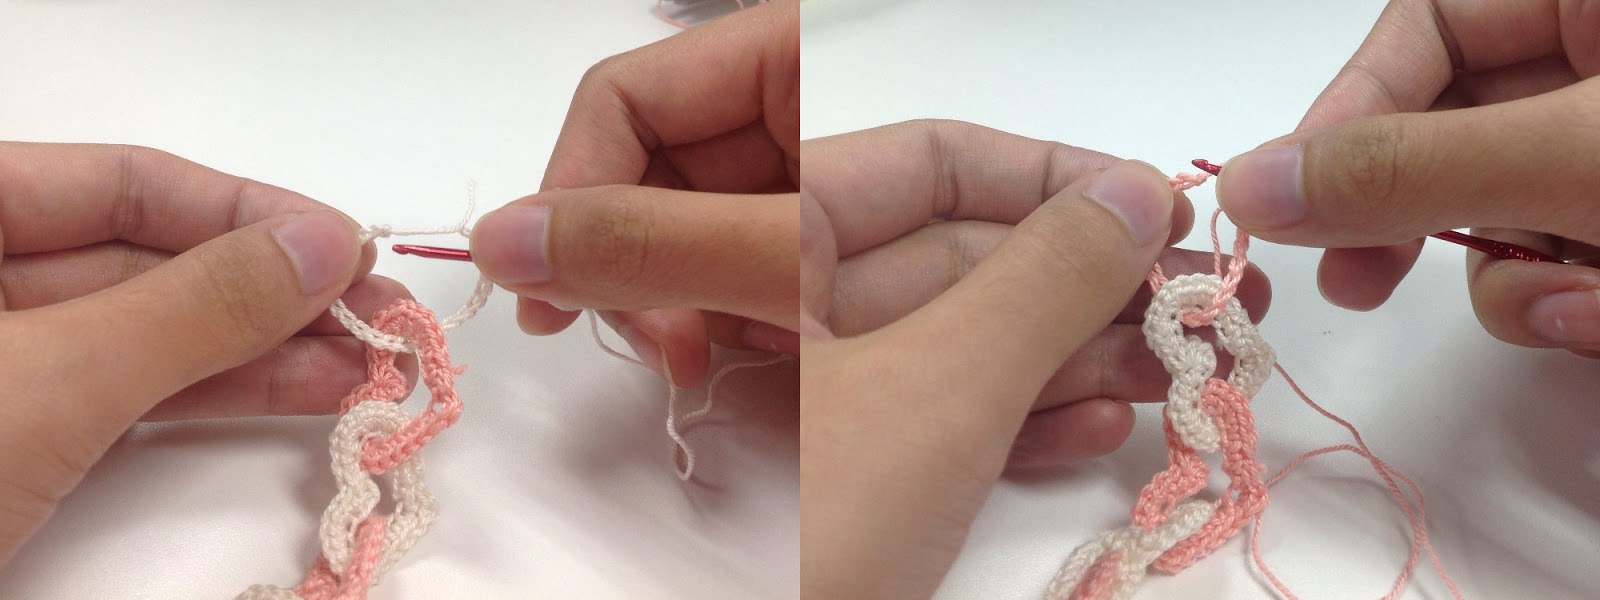
Note: It is important that you take note of how you are inserting your chain. If you insert it from behind the previous heart, the next heart will have its curved part on top of the previous heart. If you insert it from the front of the previous heart, the previous heart will appear to be on top of your next heart. Check this out on the pictures below:

Left: inserting the tail end of the yarn from the back of the previous heart
Right: inserting the tail end of the yarn from the front of the previous heart


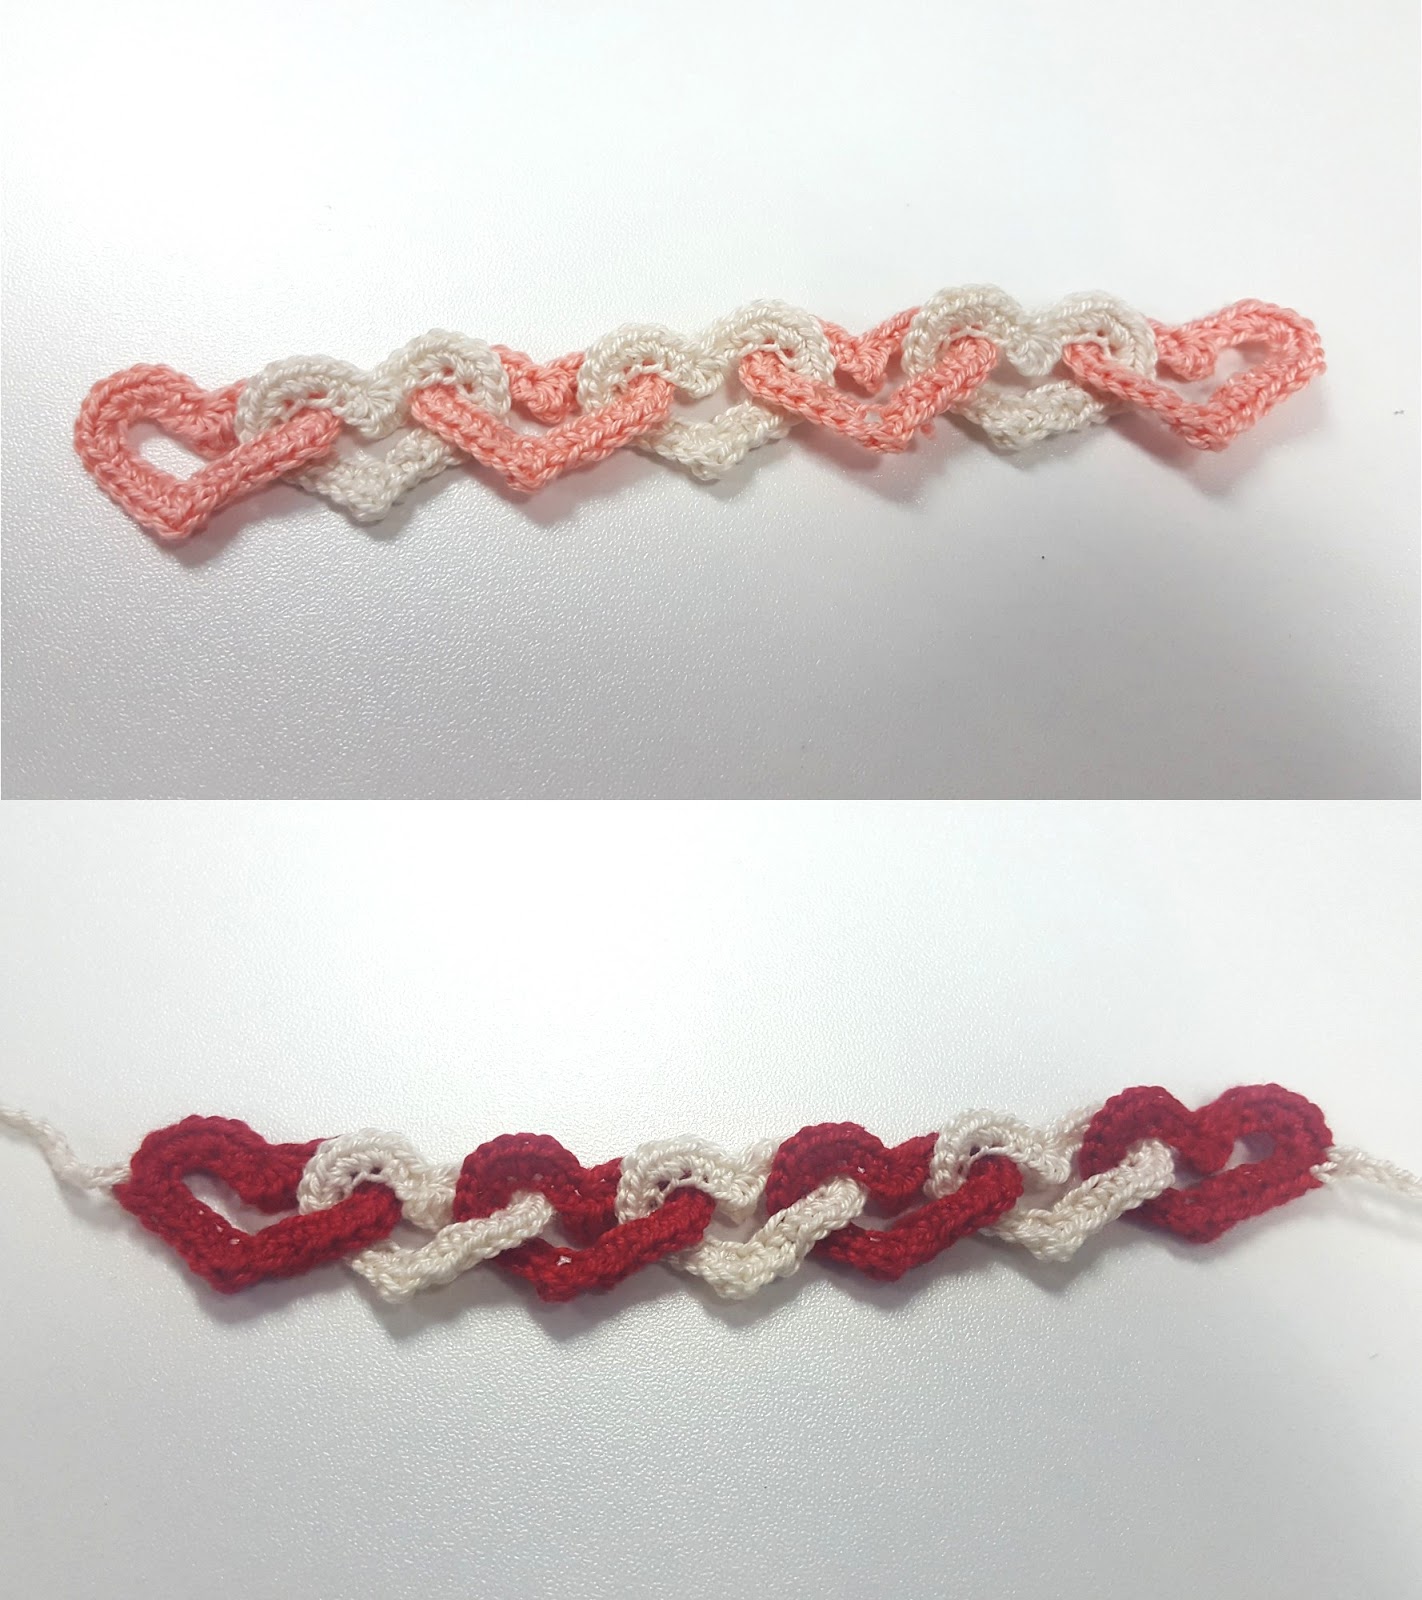
Because I didn't know about this when I made my third heart, the second (white) heart appeared to be on top of the first and third hearts. This wasn't how I intended the linked hearts would look like, but I thought it looked nice too so I continued alternating the way I inserted my chains. Refer to the images below to see how the hearts look like using the two ways of linking them.

Top: alternating inserts of chains
Bottom: insert the chains consistenty from the back of the previous heart


Going back, once you've inserted your chain and formed a ring, repeat the same steps mentioned above in the first heart. You can now keep on making hearts until you reach your desired length.

Finishing the bracelet


There are several ways on how you can finish your bracelet.

Continuous Hearts

The first one is by linking your last heart to the first heart as well. The bracelet looks good with this technique because the hearts are continuously linked, but you have to make sure that your hand will fit through the bracelet to be able to wear it.

If you choose this, end your bracelet by linking the last heart to the second to the last heart and first heart at the same time. It can be tricky, but it's doable.

1. If you chose method 1 to link your hearts, insert the tail end of your last chain from behind the previous heart, and then insert the working end from behind the first heart as well.

2. If you chose method 2, insert the tail end of your last chain from behind (if you chose to insert your previous hearts from behind) or from the front (otherwise) of the previous heart, and then insert the working end from the front (or the back) of the first heart. Note that the ways you insert the tail and working end should be opposite. If you inserted your tail end from the back, insert the working end from the front.

You hook might get caught up in the first heart, so what I did was I removed the hook and held on to the loop until I was able to insert it to the first heart, and then I returned my hook to the loop. Your working yarn will be caught through the first heart, but that's okay; you can still pull through it and work with it. When you fasten off, just pull the working yarn from your heart and through the first heart.

Once you've slip stitched to your first chain and formed a ring, you can start finishing your last heart as usual.


Using a chain string for tying

This method is more flexible because you can easily resize the bracelet using the chain string. Your hearts might not look like it's linked continuously, but at least you won't have to worry if your bracelet's not gonna fit your hand or the hand of the person you're going to give this to.

To do this, starting on the leftmost heart such that the tips of the hearts are to the left, join your yarn to the 7th sc from the bottom tip of the heart, chain 1, and sc to the next st.  Chain up to your desired length, fasten off and cut your yarn. Do the same to the rightmost heart, but this time join your yarn on the 6th sc from the bottom tip of the heart.


Other ways

Button - You can also use a button to fasten your bracelet. Attach one button to one end of your linked hearts, and then to wear it just insert the button through the opposite heart. Your button, however, should be the right size so it won't come off easily.

Clasps - Alternatively you can also attach clasps to each end of the bracelet by sewing them on the 6th st from the bottom tip of the heart.

Continuous Hearts and Using a chain string


Some tips


These linked hearts look pretty, and they are really unruly too! They tend to twist and turn and move around, so I suggest sticking the hearts together by either using hot glue on the overlapping parts, or sewing them together. That way you keep the hearts in place.


And that's it! It was my first (kinda) time working with a 2mm hook and such fine yarn. I thought I was gonna get dizzy because of the smallness, but luckily that didn't happen. I am even getting the hang of it - these hearts just turned out to be so cute! I will probably do more projects using these yarns in the coming weeks; I actually have some ideas already right now. So stay tuned!

Start making these bracelets now, wear them, give them, spread the love. ❤

Enjoy crocheting AF! \m/


This pattern is free and not for sale. Please credit and link back to this site when sharing, using for business, etc. Thanks! :)
Wednesday, February 1, 2017

Valentine Gift Bags (and more!)

Valentine's day is just around the corner, and it's the season of giving! I know Christmas is really the season of giving, but Valentines is also a time when people give gifts to their loved ones. People give Valentines cards, flowers, stuffed toys, sometimes balloons too, and of course Valentines will not be complete without the sweets. We give these gifts to show our love to the special people in our lives, but what better way to let them feel our love than to give them handmade gifts?

So I rounded up these Valentine bags, purses, containers, what-have-you - for all of us to enjoy! These Valentine gift containers are so cute, they are gifts themselves as well. They're all pretty easy to make, so there's no worry that you won't be able to finish in time to pack them up with your choice of gifts and give them out by Valentines day. And most importantly, they're free!


Crochet Heart Baskets
These crochet heart baskets are really cute, and I think they will really look good when filled with candies! The pattern used a 12mm hook so these baskets turned out pretty big, but you can scale down your hook size and yarn choice for smaller-sized baskets.


Valentines Day Gift Bag
A drawstring gift bag that you can use to store candies, chocolates, small notes, and just anything lovely! The pattern used intarsia crochet technique to make the heart design in the middle.


Envelope with Heart
Maybe too small or thin for keeping candies in (surely, you don't want to put just one chocolate inside, right?), but I think this will be perfect for jewelries like bracelets and necklaces, with a little note inside saying something like, "You envelope me with your love." So cheesy! I'm sure you can come up with a better line than me. :)


Heart Coin Purses
These may be coin purses, but you sure can put a lot more in there than just coins! This pattern may require a little more effort because of all the sewing of the zippers, but it's worth it because you (or the one you're giving this to) can actually use it as a coin purse. Talk about practicality! And whenever they need some change, they will remember you. ❤


Daisy Heart Granny Purse
Such cute handle! A heart with a handle! Like saying, "You hold my heart." Here I go again with my mushy lines! I should just probably busy myself making these. :) You can definitely give this to anyone you like, but I think this will really look cute for kids. Because Valentines is not just for romantic love, it's for all types of love! ❤


Cable Heart Gift Bag
Now these bags just demand that you put more chocolates in there! Just kidding. These are really cute and handy bags that you or your loved one can definitely reuse.


Valentine Chocolate Box (and chocolates!)
Now this is not exactly a fast one to make, but it's a clever idea, right? A chocolate box that never empties. Haha! Although your loved one might get disappointed (or pissed, even!) at you for giving them fake chocolates, you should probably have some real chocolates at the ready for damage control. Or of course if you don't want to make the crochet chocolates, you can just fill this box with real ones. Or if you're a prankster like me, just make the crochet chocolates and put them in a real chocolate box! That's really mean, don't do that unless you are very secure with the relationship you have.


Sweet Heart Goody Sac
As a gift bag, or a scent bag, or decoration - you can have this in many ways! Ain't that a treat. :)


Valentine's Day Mini Treat Bags
Last but not the least! These cute bags are simple and easy to make, and you can even make them without the heart (for non-Valentines days, or when you're just not really a fan of hearts).


Can't wait to try them out? Start making them now and spread the love around.

Enjoy crocheting AF! \m/


Wednesday, January 25, 2017

Heart Cactus Amigurumi

I know it's still January, but Valentines day is just less than a month from now! Besides, I think we should celebrate love everyday, don't you agree? Not just romantic love, but all the kinds of love we feel - love for our family, for our friends, for our pets, for our hobbies, for our food, for our passion, everything! And I believe that if everyone takes time to celebrate love everyday, even just for a while, the world will be a so much better place. Feels like I just answered a beauty pageant question.

Anyway, enough of the beauty pageant feel and let me go back to my beautiful reality of crochet. For the past days I have been thinking of what to post for Valentine's day. I had several ideas which I eventually scrapped, because I realised they're a bit time consuming, and I've been a bit busy (again!) lately because of work and school. So I thought of doing something simple in the meantime, and while I was looking for inspiration in Pinterest, I came across this cute pattern for heart amigurumis. Maybe I can make a keychain out of it? And then I saw my immortal succulent on my bedside table, and finally the idea hit me. I'm going to make a heart-shaped cactus. So cute!


Materials
Hook: 4mm crochet hook
Yarns:
Gantsilyo Guru Milk Cotton Light Lime (green)
Gantsilyo Guru Milk Cotton Light Wood (brown)
some yarn of your choice for the flower


Stitches Used
ch (chain)
sc (single crochet)
sl st (slip stitch)
sc2tog (sc decrease / sc 2 together)


Heart Amigurumi Pattern

The design for the heart amigurumi was inspired by the pattern I found here. This pattern had 3 different sizes of hearts, but I wanted an even smaller size because I want my cactus to be cute and not too bulky, so I tweaked it a bit. But if you want to make yours bigger, maybe something you can use as a centerpiece (or if you simply want a heart-shaped pillow), do check out that cute pattern. :)

Heart Base

Using green yarn, make a magic ring. Note: do not join at any point, continue working in the round.

Row 1: ch 1, sc 4 in the ring. (4sts)

Row 2: *2 sc in the first st, sc in the next. Repeat from * around. (6 sts)

Row 3: *2 sc in the first st, sc in the next. Repeat from * around. (9 sts)

Row 4: *2 sc in the first st, sc in the next 2 sts. Repeat from * around. (12 sts)

Row 5: *2 sc in the first st, sc in the next 3 sts. Repeat from * around. (15 sts)

Row 6: *2 sc in the first st, sc in the next 4 sts. Repeat from * around. (18 sts)

Row 7: *2 sc in the first st, sc in the next 5 sts. Repeat from * around. (21 sts)

Row 8: *2 sc in the first st, sc in the next 6 sts. Repeat from * around. (24 sts)

Row 9: *2 sc in the first st, sc in the next 7 sts. Repeat from * around. (27 sts)

Row 10: *2 sc in the first st, sc in the next 8 sts. Repeat from * around. Do not fasten off. (30 sts)


Heart Bumps

Now we're going to start making one bump of the heart. We will have to fasten of at the end of one bump, and then rejoin the yarn for the other bump.

Continuing from where we finished in the heart base:

Row 11: 1 sc in the next 15 sts. (15 sts)

Row 12: Skip the next 15 sts and sc in the first st of row 11, sc in the remaining 14 sts. (15 sts)

Row 13: *sc2tog, sc in the next 3 sts. Repeat from * 3 times. (12 sts)

Row 14: sc2tog 6 times. (6 sts) Fasten off, and weave the tail of the yarn to tighten the opening of the bump.

Start stuffing your heart at this point.

Hold the heart such as the finished bump is on the right side if you are right-handed, and on the left side otherwise. Remember how in row 11, we only did 15 sc's on the first 15 stitches? So we still have 15 stitches left that are unworked from round 10. Join your yarn on the first unworked stitch in the center of the heart base, right where row 11 of the first bump ends (refer to image here; sorry I wasn't able to take pictures while doing this!).

Row 15: sc in each st around, and then sl st to the bottom center of the finished bump. This is to avoid having an opening right in the middle of the two bumps (refer to image here). (15 sts)

Row 16: sc in each st around, skip the sl st. (15 sts)

Row 17: *sc2tog, sc in the next 3 sts. Repeat from * 3 times (12 sts)

Finish stuffing your heart.

Row 18: *sc2tog 6 times. (6 sts) Finish off like we did in the first bump.


Soil Pattern

For the soil, it depends on how big your container is going to be, so you can add/remove increase rows in this pattern to fit your "pot."

Using brown yarn, make a magic ring.

Row 1: ch 1, sc 6 into the ring. Do not join. (6 sts)

Row 2: 2 sc in each st around. (12 sts)

Row 3: *2 sc in the first st, sc in the next st. Repeat from * around. (18 sts)

Row 4: *2 sc in the first st, sc in the next 2 sts. Repeat from * around. (24 sts)
Note: You can stop the increase at this row and proceed to row 6 if your container is small.

Row 5: *2 sc in the first st, sc in the next 3 sts. Repeat from * around. (30 sts)

Row 6-12: sc in each st around. (30 sts)
Note: You can add another round of increase here (to 36 sts) if your container is big, and you can also add more rows of sc's if your container is deep.

Row 13: *sc2tog in the first st, sc in the next 3 sts. Repeat from * around. (24 sts)

Row 14: *sc2tog in the first st, sc in the next 2 sts. Repeat from * around. (18 sts)

Fill your soil ball with stuffing at this point.

Row 15: *sc2tog in the first st, sc in the next st. Repeat from * around. (12 sts)

Row 16: sc2tog around. (6 sts) Fasten off.


Flower Pattern

For the flower, I used the flower pattern I found here (the flower pattern is somewhere at the bottom part of the post). It's pretty simple and very easy to make, and I already used this for making my cactus amigurumi gifts last Christmas (stay tuned, I will be posting these too, soon!).


Assembling the Cactus

First, attach your flower to the heart amigurumi. You can either sew it, or just use hot glue if you are a bit lazy like me (haha!). You can attach in anywhere you want, on one of the bumps, on the front side, etc.

And then attach your heart amigurumi to the soil, again either by sewing or using hot glue. Note, however, that since our heart has a small tip at the bottom and is therefore top-heavy, if you use hot glue it might not be very stable especially if you made a big heart. You can flatten the bottom part a bit to have more surface to glue on to the soil.

Finally, put your cactus in a container of your choice - pot, teacup, can, what-have-you! As for me, I used a cupcake paper cup, which happens to be a square in this one.


And there you have it! This design is so simple and cute, and not overly romantic-looking, so you can give this to your friends or your family as a simple Valentines token.

Again I apologize for the lack of pictures to guide you along the way of constructing the challenging or confusing parts of this design. Next time I will do my best to stop myself mid-crochet, and take pictures first before finishing everything off!

Enjoy crocheting AF! \m/


This pattern is free and not for sale. Please credit and link back to this site when sharing, using for business, etc. Thanks! :)
Tuesday, January 17, 2017

2-in-1 Beanie: Messy Bun and Slouchy Beanie (convertible!)

Messy bun beanies have been so trendy lately, and of course I thought of making one for myself too! I often wear my hair in a bun especially when it's windy and when it's humid, because my hair can get really stubborn and bushy and frizzy.. I sometimes think I have Hermione hair. Haha! And because I bleached and colored my hair a couple of months ago, my hair really became dry and can get out of hand sometimes.

But enough of my hair! Going back, I saw a lot of crochet patterns of messy bun beanies in Pinterest, and I mean a lot. And I get why it's gaining popularity, buns are also popular nowadays (even for men!). I think this is a good idea, because really, nobody wants to wear a bonnet with their buns bulging out on top of their heads, nor let down your hair just to wear your beanie, and then have your hair get untidy and all over the place (just like mine). You want to be warm, and at the same time keep your hair out of the way. Therefore, messy bun beanies! Thank you to whoever came up with this idea.

While I think messy bun beanies are useful, I also thought, what if I do want to let my hair down? Because sometimes I get slight headaches when my hair has been tied for quite a while. Does this mean I have to bring two beanies when I go out? It's a bit awkward to wear a beanie with a hole on top when I don't have a bun going on.. So the idea hit me, and I came up with the 2-in-1 Messy Bun and Slouchy Beanie! It's convertible, you can wear it as a messy bun beanie or a slouchy beanie, whichever you feel like doing.

There are two "techniques" that I used in making this convertible beanie possible. The first one is the draw-string feature, which I got from making draw-string pouches before. I used this one to close off the bun hole on top of the beanie. The second one is the folding beanie brim which I also got from making one of my handmade gifts last Christmas. So I put them together and, ta-da! Two-in-one beanie.


I'm shy!


Materials
Hook: 5mm crochet hook
Yarns:
Gantsilyo Guru Milk Cotton Light


Stitches used
ch (chain)
dc (double crochet)
sl st (slip stitch)
sc (single crochet)
blo (back loop only)


Base Beanie Pattern

Pattern here. Additional instructions below.

For the main beanie, I used the pattern above, and I switched colors at some rows to have a striped effect. I added 3 more rows right before the brim (after the 11th row). Note that by the end of this part, your beanie should be just the right length and size to fit your head without covering your eyes. This length will be the length of your messy bun beanie.

After adding in the extra rows, start making the brim as instructed in the pattern above. If you want to make your slouchy beanie more slouchy, add a few more chains to your brim to make it longer.


Adding the draw-string:

What we want to happen at this part is, when you are wearing the hat as a bun beanie, the draw string should be perfectly fit with the hole (no extra dangling parts) so it looks clean. 

Ch 48, do not fasten off yet. Weave your chain through the first row of the beanie (the first dc row after the hole) every 2 dc posts, until the two ends of your chain meet. You can either insert add a bead to each end of the chain to keep them from slipping through the dc posts, or tie a knot to the ends. I did knots because I didn't have beads, however if you choose to do this you have to tie a really thick knot. Add or remove chains as needed, then fasten off. Again, we want the draw string length to be the same length as the hole, after the knots or beads.


So if you want to wear this beanie with your messy bun, simply fold up the brim and wear it like a normal beanie. If you want to hide the ends of the drawstring, you can push them through the dc posts.


And if you want to wear it as a slouchy beanie, just pull both ends of the draw-string chain until the hole on top closes off, and then tie them together. If you also want to hide the drawstring, tie them on the inside part of the beanie.


That's pretty much it! Hit me up with your comments, suggestions and stuff on the comments section below, and I hope you enjoy this patterns as much as you enjoy crocheting AF! \m/


This pattern is free and not for sale. Please credit and link back to this site when sharing, using for business, etc. Thanks! :)
Wednesday, January 11, 2017

Simple Men's Beanie

As I mentioned in my previous post, the cherry blossom beanie I made for my friend was originally intended for her birthday. Since her and her fiance's birthdays are only 10 days apart, I decided to make him one too. I wanted to give them a couple-something that they can wear together, so I used the same blue yarn I made the cherry blossom beanie with to accent his own beanie.

This pattern is pretty simple and straightforward, and fast too, since I used double crochets all through out. It's also very basic, and can be used as a "foundation beanie" when you want to add decorations like ears or flowers, or bows, etc.

The beanie's size is a bit big, because my friend's fiance is a big guy. I forgot to measure it before giving it to them, but you can make adjustments as you go whenever you think the beanie's becoming too big by skipping an increase row. In my pattern below, I added two versions for large and extra-large.

Although I made this beanie for a guy, because of it's simple design, it can be for any gender. It can even be for kids too. Just adjust the size by adding or removing rows with increases. You can experiment with the pattern because it doesn't require any number of stitch at any point.


Materials
Hook: 5mm crochet hook
Yarns:
Dapper Dreamer Stardust Black
Dapper Dreamer Stardust Powder Blue

Stitches Used
ch (chain)
dc (double crochet)
sl st (slip stitch)
dc2tog (dc together)


Beanie
Note: Counts inside [ ]  are for the large size.

Using the black yarn, make a magic ring.

Row 1: ch 2, 11 dc in ring. Join with a sl st to the first dc. (11 sts)

Row 2: ch 2, 2 dc in each st around. Join with a sl st to the first dc. (22 sts)

Row 3: ch 2, *2 dc in the first st, dc in the next st* repeat around. Join with a sl st to the first dc. (33 sts)

Row 4: ch 2, *2 dc in the first st, dc in the next 2 sts* repeat around. Join with a sl st to the first dc. (44 sts)

Row 5: ch 2, *2 dc in the first st, dc in the next 3 sts* repeat around. Join with a sl st to the first dc. (55 sts)

Row 6: ch 2, *2 dc in the first st, dc in the next 4 sts* repeat around. Join with a sl st to the first dc. (66 sts)

Row 7: ch 2, *2 dc in the first st, dc in the next 10 sts* repeat around. Join with a sl st to the first dc. (72 sts)

Row 8: ch 2, *2 dc in the first st, dc in the next 11 sts* repeat around. Join with a sl st to the first dc. (78 sts)

Row 9: ch 2, [2 dc on each st around] *2 dc in the first st, dc in the next 12 sts* repeat around. Join with a sl st to the first dc. ([78 sts] 84 sts)

Rows 10 - 13: ch 2, dc in each st around. Join with a sl st to the first dc.

Row 14: Switch to blue yarn. Ch 2, dc on each st around. Join with a sl st to the first dc.

Row 15: Switch to black yarn. Ch 2, dc on each st around. Join with a sl st to the first dc.

Row 16: Repeat row 14.

Row 17: Switch to black yarn. Ch 2, *dc2tog in the next st, dc in next [11 sts] 12 sts. Join with a sl st to the first dc. ([72] 78 sts)

Row 18: ch 2, dc in each st around. Join with a sl st to the first dc. Fasten off.


This pattern is really basic, and you can make it with many different variations. You can add more stripes, or have no stripes at all. You can also use different colors if you want. You can even use sc or hdc for the striped parts for a thinner stripe effect, or a combination for a varied effect; just remember to adjust the length accordingly.

I would recommend this pattern when you want to whip up something handmade and personal and give it as a gift, but either you are lacking time or you are just starting to learn crochet. The pattern is really simple and not intimidating with many different stitches. The resulting beanie is also simple which makes it good for daily wear.

So that's it! I really like this pattern for its simplicity and I can easily say it's one of my favorites. I hope you guys find this pattern useful too. As always, leave your thoughts on the comments section below, and have a nice day crocheting AF! \m/


This pattern is free and not for sale. Please credit and link back to this site when sharing, using for business, etc. Thanks! :)

Wednesday, January 4, 2017

Sakura (Cherry Blossom) Beanie Pattern

This beanie was one of the first gifts I made last year. It was for my travel buddy who loved cherry blossoms so much, so when I was browsing for crochet projects and I chanced upon this pattern for cherry blossoms, I thought I'd make her something with cherry blossoms in it. And what else should it be but a beanie! I think it's great for travelling especially to cold places, and also great for hiding your hair after sleepless nights of taking care of your child. Yes, she has a little one, and I also made her something (that I will be posting in a couple of weeks).

I'm trying hard to justify my decision of giving her a beanie, and while all these things that I said are true, I have to admit that I chose to make her a beanie because it's fast and simple. Hahaha! But it's also useful, right?

I originally intended to give her this beanie as a birthday present (her birthday was on November). However, I also had plans on making beanies for our other friends, and then I realized! If I gave her this beanie on her birthday, I would have to give her something else for Christmas, while everyone else will be getting beanies. She will be the odd one out and I don't want that; I like giving almost the same gifts to my friends, and it's complicated to explain why (haha!). Also, if I gave her a beanie before Christmas and our friends find out about it, they will have an idea that I will also be giving them the same thing for Christmas. No more surprise! So finally I decided against it, and although I finished her beanie before her birthday, I held on to it and gave it to her for Christmas.

Such a long story! So anyway here's the pattern now:


Materials
Hooks:
For the beanie - 5mm crochet hook
For the cherry blossoms - 4mm crochet hook
Yarns:
Dapper Dreamer Stardust Powder Blue
Gantsilyo Guru Milk Cotton Light Pastel Pink
some brown yarn
some dark pink yarn

Note: In the cherry blossom pattern I used (found below), it required a 3.5mm hook. You can opt to use this; I only used 4mm since I didn't have a 3.5mm yarn on hand.


Stitches Used
ch (chain)
hdc (half double crochet)
sl st (slip stitch)
hdc2tog (hdc together)
fpdc (front post double crochet)
bpdc (back post double crochet)


Beanie

Using the blue yarn and your 5mm hook, make a magic ring.

Row 1: ch 2, 11 hdc in the ring. Join with a sl st to the first hdc. (11 sts)

Row 2: ch 2, 2 hdc in each st around. Join with a sl st to the first hdc. (22 sts)

Row 3: ch 2, *2 hdc in the first st, hdc in the next st* repeat around 11 times. Join with a sl st to the first hdc. (33 sts)

Row 4: ch 2, *2 hdc in the first st, hdc in the next 2 sts* repeat around. Join with a sl st to the first hdc. (44 sts)

Row 5: ch 2, *2 hdc in the first st, hdc in the next 10 sts* repeat around. Join with a sl st to the first hdc. (48 sts)

Row 6: ch 2, *2 hdc in the first st, hdc in the next 11 sts* repeat around. Join with a sl st to the first hdc. (52 sts)

Row 7: ch 2, *2 hdc in the first st, hdc in the next 12 sts* repeat around. Join with a sl st to the first hdc. (56 DC)

Row 8: ch 2, *2 hdc in the first st, hdc in the next 13 sts* repeat around. Join with a sl st to the first hdc. (60 DC)

Row 9: ch 2, *2 hdc in the first st, hdc in the next 14 sts* repeat around. Join with a sl st to the first hdc. (64 DC)

Row 10: ch 2, *2 hdc in the first st, hdc in the next 15 sts* repeat around. Join with a sl st to the first hdc. (68 DC)

Row 11: ch 2, *2 hdc in the first st, hdc in the next 16 sts* repeat around. Join with a sl st to the first hdc. (72 dc)

Row 12: ch 2, *2 hdc in the first st, hdc in the next 17 sts* repeat around. Join with a sl st to the first hdc. (76 dc)

Rows 13 - 18: ch2,  hdc all around. Join with a sl st to the first hdc.

Row 19: ch 2, *hdc2tog in the next st, hdc in the next 17 sts* repeat around. Join with a sl st to the first hdc. (72 dc)

Row 20: ch 2, *fpdc in the next st, bpdc in the next* repeat around. Join with a sl st to the first fpdc.

Rows 21-22: Repeat row 20


Flowers

For the cherry blossoms, I used the pattern I found here. It's very simple and easy. For my beanie, I made 3 flowers; you can choose to add more flowers if you want to, especially if you used a 3.5mm hook and made smaller flowers.


Assembly

For the branch, I used the brown yarn to stitch a branch shape on one side of the beanie. I just winged it, making the lower part of the branch a bit thicker than the tips. I made 3 branch tips, and of course you can put more if you want. I attached a flower to each tip of the branch; and again if you want, you can add more flowers on the branches as well.


And that's it! It's pretty simple, although I admit I struggled a bit in making the branches. I had to redo it multiple times since I'm not really good at sewing. I like how the ribbed brim of the beanie turned out; it was my first time using the fpdc and bpdc stitches. Before this, I only knew how to make the ribbed effect by stitching on the back loops only, but that will only work if you're making the beanie from top to bottom. So for this beanie, I wasn't only able to finish a gift for a friend, but I also learned something new.

As you can see in the picture, the cherry blossom branch is a bit subtle especially if it's on the side of the head. You can make the cherry blossom more pronounced by adding more sub-branches, and then attaching flowers on each additional branch.

I would also recommend making smaller flowers, since in this beanie the cherry blossoms looked a bit bigger than I wanted them to. Also I think with smaller flowers, it will be closer to how cherry blossoms actually look like. You'll also be able to put more flowers to make the design more obvious without overloading the beanie. And lastly, I think smaller flowers will look cuter too. :)

Before I end this post, I just want to share one brilliant Japanese concept, mono no aware, a term that describes the impermanence of life. Cherry blossoms only bloom for about a week each year, making it special and very much valued. If we think about it, our lives can be viewed the same. Just like the sakura, life is delicate and beautiful, and tragically short.

Mono no Aware. Thank you to my friend Summer for sharing this concept with me.
Photo by me in Tokyo, 2014.


For questions, suggestions, anything you want to say - just leave them in the comments section below. As usual, enjoy crocheting AF beautiful people! \m/


This pattern is free and not for sale. Please credit and link back to this site when sharing, using for business, etc. Thanks! :)

Tuesday, January 3, 2017

Hello 2017!

Happy New Year!!

Yeah I just wanted to say that :)

I know I haven't been posting any patterns lately, I've been busy with all the holiday buzz and making all those Christmas presents for friends and family. Yes, I started making them last July and just finished on time. Almost half a year! You probably won't believe me but I think you will once I start posting the gifts I made in the following days. ;) I think I made roughly 30 crocheted gifts for Christmas. That was a lot! And I'm still actually doing a couple more for the friends I wasn't able to meet over the holidays. Crazy!

You might think I must have regretted choosing to give handmade gifts. But I don't! I think it was a really great decision, for a number of reasons:

  • I really, really enjoy crochet
  • I was able to practice my crochet skills
  • I was able to give gifts with my own personal touch
  • I was able to design new patterns that I will post in this blog soon
  • I can now build my crochet portfolio for my upcoming crochet business

Neat, right? Making these handmade gifts served a lot of purposes. Now that the season of gift-giving is over, I'm a bit worried about what I will be doing next! Hopefully stuff for my crochet business. Please support me! :)

Looking back at 2016, a lot of people might think it was a terrible year, and I might just agree that it really was horrible for some parts. But for me, there are still a lot of things to be thankful for this 2016. And this is one of them. 2016 was the year I learned how to crochet, from my first (failed) coaster to bigger projects like beanies, and for this I am grateful. :)

Now that 2017 has come, new year won't be complete without a new year's resolution (cliche, I know)! For me, I will be posting more patterns this year, hopefully twice to four times in a month. I'm planning on publishing my patterns every Thursday, so stay tuned!

Looking forward to a great year of crocheting AF! \m/


Wednesday, September 21, 2016

Free Fruity Coaster Patterns

I'm back! It's been over a month since I last posted something in my blog. I've been busy making stuff for Christmas gifts - yes, as early as July! Since I want to give crocheted gifts to a handful of family members and friends. Ambitious, right? But that's why I started early. I remember one of my friends told me she planned on giving placemat-coster sets to her married couple friends for Christmas, but she started a bit late so in the end she crammed and stayed up for several nights to finish everything, and it was not a pleasant experience for her. Thanks to her, I learned from her story, started early so I think I can make it in time. :)

As promised, I am finally making my first pattern collection: fruity coasters! Here are 5 fruit coaster patterns that I've tried. These are really good patterns to begin with when you're practising your newly-acquired crochet skills. I've also managed to master crocheting circles because of these. I also think these coasters are cute and unusual, which makes them great as gifts, too.


Some of these patterns are designed by me, and some I found in other cool and interesting blogs.


1. Whole Lemon Coaster
Lemony! Tangy! A new take on a lemon coaster - not the cross-section, but the whole thing. Get it now. Make it. Have fun with it.


2. Watermelon and Grapefruit Coaster
Refreshing fruits for your refreshing refreshments!


3. Kiwi Coaster
Kiwi is juicy, kiwi is funny, kiwi is yummy! I totally have no idea what I'm saying here.


4. Apple Coaster - For this one, I skipped the last optional round since I have achieved the coaster size I wanted, and I also wanted the apple shape to be more evident.


5. Strawberry Coaster
Straw-very easy to make! Get it? Pun-ny, I know.


I still have a number of fruit coasters I want to make, and I'll post them too as soon as I get them done. Right now, I hope you enjoy making these fun fruity coasters as much as I did. And as always, Enjoy crocheting AF! \m/


This pattern is free and not for sale. Please credit and link back to this site when sharing, using for business, etc. Thanks! :)

Monday, July 25, 2016

Kiwi Coaster Pattern

Kiwi!

I can't think of an introduction to this post other than my boyfriend loves kiwi, and he eats it without peeling off the hairy skin. WTF right?? He says he eats the skin as well because it's nutritious, but I still don't understand how he manages to eat them without getting itchy or something. But we all have our own quirks right? So I don't judge him (I just occasionally make fun of him for that, which is all cool with him, or which he already got used to, hehe).

So this is my third coaster pattern, and it basically uses the same pattern as my watermelon and grapefruit coasters, but with different color changes and I think one less row as well. Hopefully next post I'll be doing the list of coaster patterns I made and used before. Next Monday, maybe? I'm thinking of posting stuff regularly, and so I'm currently deciding which day of the week is best - currently deciding between Monday and Tuesday - what do you guys think? :)

Anyway I said I won't be doing much introduction but I got derailed but now I'm back on track and here it is now, without further ado, the pattern!

Orange on kiwi! Not sure why I did this.


Materials
Hook: 4mm crochet hook
Yarns:
Gantsilyo Guru Light Cashmere Blend White
Gantsilyo Guru Milk Cotton Light Lime (green)
Creme de la Creme Fudge Brown
Some black yarn

Note: Again, I would recommend using the same type of yarn throughout the project, to get the same gauge and thickness and all that in all parts of the coaster.


Stitches Used
ch (chain)
dc (double crochet)
sc (single crochet)
sl st (slip stitch)
magic ring


Kiwi Coaster

Using white yarn, make a magic ring.

Row 1: ch 2, 12 dc in the ring. Join with a sl st to the first dc (12 sts).

Row 2: Change to green yarn. Ch 2, 2 dc in each st around. Join with a sl st to the first dc (24 sts).

Row 3: ch 2, *1 dc in next st, 2 dc in the next* repeat around 12 times. Join with a sl st to the first dc (36 sts).

Row 4: ch1, *1 sc in next 2 sts, 2 sc in the next* repeat around 12 times. Join with a sl st to the first sc (48 sts).

Row 5: Change to brown yarn. Ch 1, *1 sc in next 3 sts, 2 sc in the next* repeat around 12 times. Join with a sl st to the first sc (60 sts). Fasten off.

For the seeds, kiwi seeds aren't really that random, so what I did was on the second row (first row of green), I stitched between the st and dc spaces (not sure if this makes sense) all around. It's a bit hard to explain, but you can refer to the image below to get a better idea of what I'm trying to say. You can also choose not to follow how I put the seeds there, and do what's easy for you (and make sure to share your technique in the comments below!) :)


For a more realistic kiwi look, I would suggest using a brown fuzzy yarn for the skin for a more hairy look; I remember my boyfriend asking me, "why doesn't it have hair?" when I showed him the kiwi coaster. He's passionate about kiwi. And the nutrition it brings. Did you know there's a lot of vitamin C in a single kiwi? Like, enough (or more than enough) for you daily vitamin C requirement? His kiwi passion has rub off me. And I am making fun of it again (I'm sorry! haha!).

So there you have it, kiwi coaster! Very simple. And nutritious. And helpful. Like your feedback and questions and reactions if you leave them in the comments section below ;) Anyway, as always, enjoy crocheting AF! \m/


This pattern is free and not for sale. Please credit and link back to this site when sharing, using for business, etc. Thanks! :)

Monday, July 4, 2016

Watermelon (and Grapefruit) Coaster Pattern

Last weekend, I was teaching my mom the different kinds of crochet stitches and how to read crochet patterns. My mom actually already knows the basic stitches such as chain and single crochet, but she doesn't know that they are called as such. When she was younger, she used to crochet stuff to earn extra on the side (like mother, like daughter!). She would be given a finished product, and she would copy how it's done based on its stitches. Without a pattern! How crazy is that? I mean, sure, we can copy stitches based on a finished product but imagine if the yarn used was fine, and you had to count how many stitches are in a row, and then count how many rows there are, etc. etc. So hands down to my mother and all the people out there copying a finished product's stitches. And thank you to those who "invented" crochet patterns and for all the available patterns now in the world that make my life and many people's lives a lot easier. :)

Anyway as I was saying, I was teaching my mom how to read a pattern, and I also taught her how to make a magic ring, how to change colors, how to make rounds, etc. When I finished teaching her all these, I looked for a simple pattern she can use to practice her newly-acquired pattern-reading skills. I wanted something that involved different stitches, but simple enough to finish in a few minutes. I simply googled, "basic crochet pattern" and a bunch of patterns came up, but most of them involved only using one or two types of stitches. Most of them are good but I just didn't quite find what I was looking for.

Then I remembered my watermelon coaster. Had I posted this pattern before, I would have used this to teach my mom how to read patterns. Ha ha!


Materials
Hook: 4mm crochet hook
Yarns:
Gantsilyo Guru Light Cashmere Blend Coral (pink)
Gantsilyo Guru Light Cashmere Blend White
Gantsilyo Guru Milk Cotton Light Lime (green)
Some black yarn

Note: I would recommend using the same type of yarn all throughout, but I only had these in hand so I made do with them. Also, it can be anything, really, as long as it's for a 4mm hook.


Stitches Used
ch (chain)
dc (double crochet)
sc (single crochet)
sl st (slip stitch)


Watermelon Coaster

Using pink yarn, make a magic ring.

Row 1: ch 2, 12 dc in the ring. Join with a sl st to the first dc. (12 sts)

Row 2: ch 2, 2 dc in each st around. Join with a sl st to the first dc. (24 sts)

Row 3: ch 2, *1 dc in the next st, 2 dc in the next* repeat around (12 times). Join with a sl st to the first dc. (36 sts)

Row 4: ch 1, *1 sc in the next 2 sts, 2 sc in the next* repeat around (12 times). Join with a sl st to the first sc. (48 sts)

Row 5: Switch to white yarn. ch 1, *1 sc in the next 3 sts, 2 sc in the next* repeat around (12 times). Join with a sl st to the first sc. (60 sts)

Row 6: Switch to green yarn. ch 1, *1 sc in the next 4 sts, 2 sc in the next* repeat around (12 times). Join with a sl st to the first sc (72 sts). Fasten off.

For the seeds, you can randomly sew in black yarn around the pink part. But as you can see in my coaster, they are not very random, because I have some difficulty randomizing things like these (hahaha!). So what I did here was: *sew in one seed in row 3, skip 2 sts, sew in one seed in row 2, skip 2 sts* and repeat that all around. I think this will not be exactly symmetrical, but it would make the seeds somewhat evenly spaced. Alternatively, you can also randomize, it's really up to you. :)


Question: My coaster looks like it has corners (made by the increases), instead of a perfect circular shape. Do any of you guys know how to get rid of those corners? Please do let me know in the comments section, I would love to know your suggestions!


Grapefruit Coaster

I used the same method for my grapefruit coaster, only using different colors, of course. I used Gantsilyo Guru Milk Cotton Light Old Rose, the same white yarn with my watermelon, and Gantsilyo Guru Milk Cotton (light) Sunshine. The adjustments are as follows:

In the beginning, use the Old Rose yarn until row 4.

In row 5, switch to white yarn as well.

In row 6, switch to yellow yarn.

For the division, I simply attached white yarn from one part of the white row to the center, then to the opposite side, three times to achieve six divisions.


The coaster measures up to 4 inches in diameter. The grapefruit measures bigger, because the old rose yarn I used is slightly thicker than the coral one for the watermelon. If you want to resize your coaster, you can simply add rows to increase size, and skip/remove rows to decrease size. Easy peasy. :)

For my recommendations, as I've mentioned earlier, I would prefer to use the same kind / weight / ply of yarns in all the rows, so the stitches will be even, and the size, too. But if you don't have the same kind, it's also just fine, as long as you can work them all with the same hook size. Also for the grapefruit, you can use a different shade of yellow for the outer row, maybe something paler. You can also sl st across the grapefruit to make the divisions, for a "more attached" version (because in this version I made, the white strings tend to loosen up and might get entangled, or something like that. You get it, I know (: ).

By the way if you didn't notice, I included a list of stitches used in this coaster, so you can already decide early on if this is the type of pattern you want to use, especially if you want to teach someone how to read a pattern (like I did with my mom, I had to find a pattern that uses different kinds of stitches). One time I was halfway through a project I was doing when I encountered an unfamiliar abbreviation in the pattern, and at that time I was reluctant on learning a new stitch, because I am lazy. Haha! So I think it's important to list the stitches used especially for beginners. I'm sorry I did not do this in my previous posts, but I will now from this post on.

Lastly, because I got inspired by teaching my mom how to do basic stitches, I made a page with the basic stitches here. I also plan to make a page for the different techniques I use (e.g., magic ring, changing colors, etc). I will post it once done!

That's it for this post, you know the drill - leave your questions, comments, suggestions, praises, what-have-you, in the comments section below. And as always, enjoy crocheting AF!


This pattern is free and not for sale. Please credit and link back to this site when sharing, using for business, etc. Thanks! :)

Tuesday, June 14, 2016

Lemon Coaster Pattern [UPDATED]

Hello!!

I've mentioned in my previous post that I've been making coasters these past weeks. I've finished a handful of them already, and I hope to post them in the coming days (sweet!). I made most of them using free patterns I found online, some I adjusted to fit the size I want, and some I improvised. I will be posting the coasters I made using my own pattern first, and hopefully you guys find it useful. :)

First one on the list of my improvised patterns is the lemon coaster - not a lemon slice, but the whole lemon with the pointy ends. I was making these citrus slices coaster one time - green for lime, and orange for, well, orange - and when I was about to start yellow for lemon, I thought, why not make the "un-sliced" version of these coasters too? So I tried looking for patterns for a whole lemon coaster, but all I found were hot pads (which I had difficulty adjusting to make it smaller) and lemon slices. Eventually, I decided to make my own lemon coaster pattern, which turned out to be pretty easy (I already got the right measurement and pattern by the second try!).


Refreshing!


Materials
Hook: 4mm crochet hook
Yarns:
Gantsilyo Guru Milk Cotton (light) Sunshine
Some green yarn


Lemon Coaster

Using yellow yarn, make a magic ring.

Row 1: ch2, 12 dc in the ring. Join with a sl st to the first dc. (12 sts)

Row 2: ch 2, 2 dc in each st around. Join with a sl st to first dc. (24 sts)

Row 3: ch 2, *1 dc in the next st, 2 dc in the next* repeat 12 times. Join with a sl st to first dc (36 sts).

Row 4: ch 1,
*
sc in next 2 sts, 2 sc in next,
hdc in next 2 sts, 1 hdc 1 dc in next st,
dc in next 2 sts, trc, ch 2, sl st to 2nd ch from hook, trc in same st as first trc,
dc in next 2 sts, 1 dc 1 hdc in next st
hdc in next 2 sts, 2 sc in next,
sc in next 2 sts
*
This is the first pointy end of the lemon. Now make 2 sc in next st, and repeat * to form other end. To finish, sc in the last st, and sl st to first sc. Fasten off.


Leaves (make two, or how many you like!)

I used the leaves pattern I found here. As you can see in the picture below, I deliberately made the leaves different in size - I still used the leaves pattern, but used hdc and dc for the smaller one, and htr and trc for the slightly bigger one. You can opt for this too, or you can have uniformly-sized leaves, it's up to you ;)

On the other hand, if you want you can also leave out the leaves and just stick with a plain lemon coaster, and I think that will also look and do just fine.

So after making the leaves, sew them to the lemon coaster, preferably to one of the pointy ends (I actually searched for images of lemons just to see where to put the leaves; silly me, right?). And then you're done!

Lemon coaster

The coaster measures 4 inches in diameter from one pointy end to the other, and 3 inches from the "flat" sides. If you want to make your coasters bigger, you can use trc instead of dc for the first row up to the third row, depending on how big you want it. If you use trc for all rows, I think it can size up to 4.5 to 5 inches measuring from the pointy ends. Additionally, you can also use a paler shade of yellow for a more lemony look.


[UPDATE] Sizing up the coaster

Thanks to AMJ for pointing out that using trc in the first row makes the stitches dense. :) So I came up with an alternative way to make your coaster bigger!

Instead of using trc in some/all of the rows in the coaster, you can also increase the initial stitches by 2 in your magic ring, and then cascade the increase to the succeeding rows. For example,

Row 1:   14  [16 | 18 | 20 | ...] sts
Row 2:   28  [32 | 36 | 40 | ...] sts
Row 3:   42  [48 | 54 | 60 | ...] sts

(The numbers in [] mean you can also start with 16 sts, then row 2 has 32 sts, row 3 has 48 sts. The same goes for 18 and 20. I also color-coded them for easier reading.)

And then for the 4th row, add one [2 | 3 | 4 | ...] *sc in next 2 sts, 2 sc in next st* at the beginning of the round, and one [2 | 3 | 4 | ...] *2 sc in next st, sc in next 2 sts* at the end. This is to make sure the number of stitches needed for the last row will be met (so the coaster will not curl), and also to keep the pointy ends opposite of each other.

I haven't tried this for much larger sizes, I have a feeling that the pointed ends might become less prominent as the coaster gets bigger. If you want to try it, let me know of your final results in the comments below!


[end of update]


If you guys have any questions, feel free to leave a comment below, and I'd also love to see your finished products so you can also leave them in the comments section. That's it for this post, so stay tuned for the next episode of this coaster series, and I hope you enjoy crocheting AF! \m/


This pattern is free and not for sale. Please credit and link back to this site when sharing, using for business, etc. Thanks! :)