 |
| Summary of Basic Crochet Stitches |
Parts of your yarn
Before starting with the details of each stitch, I'd like to define first the "parts" of the yarn, so it will be easier to explain the different stitches as we move along. There are two main "parts" of your yarn: the tail end and the working yarn. The tail end is the part of your yarn where everything ends - it's literally the "end" of your yarn. The working end on the other hand is the part that is connected to everything else - the rest of your skein/yarn ball.
Slip Knot
The slip knot is basically how all crochet projects start - well, almost. Some start with magic rings, which I will be describing in another page.
The slip knot is basically how all crochet projects start - well, almost. Some start with magic rings, which I will be describing in another page.
1. Make a small letter "b" using your yarn, with the tail end behind the working yarn, and slightly extending the tail end past the working yarn.
2. Insert your hook through the loop of the "b", and pull the working yarn through the loop.
3. Pull both ends to tighten the knot, with the loop in your hook.
Chain (ch)
The chain is the most basic type of stitch, and is very often used as a foundation for many crochet projects.
1. Starting with a slip knot, yarn over.
2. Pull through the loop in your hook. That forms your chain. Simple!
Slip Stitch (sl st)
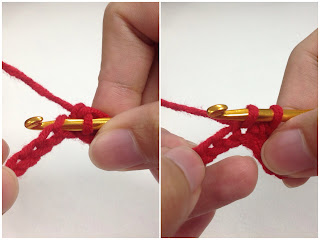
The slip stitch is usually used for joining two separate edges, or joining layers to make a thicker layer (for example: pot holders, baby sandal soles, etc.), or sometimes also joining yarn.
 |
| Slip Stitch - in the second image, pull that left loop through the right loop. (I was so lazy to take a picture of it so I just reused this, sorry!) |
1. Insert your hook into the indicated stitch or space.
2. Yarn over. Pull through both loops in your hook.
Single Crochet (sc)
The single crochet is the basic type of crochet stitch, and I think this is the most fine / dense type of crochet stitch.
1. Insert your hook into the indicated stitch or space.
2. Yarn over. Pull through one loop (the indicated stitch/space) in your hook (2 loops left in your hook).
3. Yarn over, and pull through both loops in your hook.
Half Double Crochet (hdc)
1. Yarn over. Insert hook into the indicated stitch or space.
2. Yarn over. Pull through one loop (the indicated stitch/space) in your hook (3 loops in your hook).
3. Yarn over, and pull through all loops in your hook.
Double Crochet (dc)
The double crochet is a commonly used stitch when you want to finish a project fast! Haha, but kidding aside, when working with a dc in beanies, scarves, etc., it's faster because the stitches are bigger/taller.
1. Yarn over. Insert hook into the indicated stitch or space.
2. Yarn over. Pull through one loop (the indicated stitch/space) in your hook (3 loops in your hook).
3. Yarn over, pull through two loops in your hook. (2 loops in your hook).
4. Yarn over, pull through both loops in your hook.
Treble Crochet (trc)
I've only used this stitch a couple of times. It's like a taller version of dc, but it tends to be a bit lose in between because of its height.
1. Yarn over twice. Insert hook into the indicated stitch or space.
2. Yarn over. Pull through one loop (the indicated stitch/space) in your hook (4 loops in your hook).
3. Yarn over, pull through two loops in your hook.
4. Repeat step 3 until you end with 1 loop left in your hook.
And that's it! I hope you find this useful and helpful, and if you have any questions or feedback, just leave them in the comments section below and I will be glad to answer.
Enjoy crocheting AF! \m/


No comments:
Post a Comment